bnpbros

  • Home
  • About
  • Tutorials
  • web design
  • graphic design
  • tips and tricks
  • contact us


FTP clients are the preferred method when using FTP to transfer files. An FTP Client is an application that specializes in optimizing your FTP connection. FTP clients need to be downloaded and installed before use. This guide covers a popular FTP Client FileZilla. iPage recommends FileZilla because it is fast, free, and easy to use.


  How to Connect to FTP Using FileZilla

Download and install FileZilla onto your personal computer. Get your FTP settings (these steps use our generic settings). Open FileZilla. Fill out the following information: Host: ftp.ipage.com Username: Your iPage hosting account username Password: Your iPage hosting account password Port: 21 Click Quickconnect. FileZilla will attempt to connect. It will display Directory Listing Successful once you are connected.

  How to Upload Files Using FileZilla
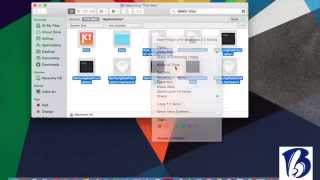
Connect to FTP. Use the Local Site area of FileZilla to locate the folder containing the files you want to upload. Use the Remote Site area of FileZilla to locate the folder you want to upload your files into. Note that the contents for each folder are displayed just below the Local Site and Remote Site areas. Click and drag your file from the Local Site side onto the Remote Site side (Note that you can also select multiple files at a time). Upload progress is displayed in the bottom area of FileZilla. Upload is complete once your uploaded files are listed on the Remote Site side.
 
  How to Download Files Using FileZilla
Connect to FTP. Use the Remote Site area of FileZilla to locate the folder containing the files you want to download. Use the Local Site area of FileZilla to locate the folder you want to download your files into. Note that the contents for each folder are displayed just below the Remote Site and Local Site areas. Click and drag your file from the Remote Site side onto the Local Site side (Note that you can also select multiple files at a time). Download progress is displayed in the bottom area of FileZilla. Download is complete once your downloaded files are listed on the Local Site side.

  Troubleshooting
What Other FTP Clients Could I Use? Here are a few options for you to consider: CuteFTP FlashFXP FTP Voyager LeapFTP SmartFTP WS FTP Prevent FTP Blacklisting As a security precaution against malicous attackers, iPage's FTP servers will blacklist the IP address of users that have an excessive number of consecutive failed login attempts. This blacklist prevents the user from gaining access into iPage's FTP servers, even if the user begins using the correct login credentials. To avoid the risk of being blacklisted, make sure that you keep your FTP client's login credentials up to date. Additionally, we recommend that you limit the number of reconnection attempts inside of your FTP client.

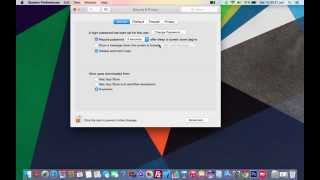
  To limit the number of reconnection attempts inside of FileZilla: Go to Edit. Click on Settings. In the window that appears, we recommend that you enter the following settings: Maximum number of retries: 3 Delay between failed login attempts: 300

FTP: How to Connect Using an FTP Client

FTP clients are the preferred method when using FTP to transfer files. An FTP Client is an application that specializes in optimizing ...

FTP: How to Connect Using an FTP Client
0
This page contains a list of all our WordPress tutorial videos.


Introduction to WordPress
Installing WordPress
Changing Themes and Appearances
Creating a Page
Creating a Blog
Adding a Photo Gallery
Uploading a Document

Tutorial

Introduction to WordPress


WordPress: Tutorial Videos

This page contains a list of all our WordPress tutorial videos. Introduction to WordPress Installing WordPress Changing Themes and App...

WordPress: Tutorial Videos
0

If you are a first time Weebly user, we recommend that you take a look at these videos before jumping into the Weebly builder. You can view the videos in full screen mode by clicking  Enter Full Screen.


Troubleshooting
Where Can I Get Help With Weebly?
Visit Weebly's Official Knowledgebase.
View our Weebly tutorial videos (above).
Contact us to sign up for the Weebly Jumpstart service, recommended for new Weebly users.
Sign up for the Web Concierge service, recommended for intermediate Weebly users.
Contact us for regular technical support regarding the Weebly builder.
I Published My Website, But My Blog Page Is Not Showing
Try to republish your website. If this does not work, proceed with the remaining steps.
Use Domain Central to find out where your domain is pointing.
Use File Manager to confirm that two files called 404.php and .htaccess exist in the directory your domain is pointing to.
Click Edit for the .htaccess file.
Copy and paste the following line of code into the .htaccess file (if the line of code does not already exist):
ErrorDocument 404 /404.php
If you still have issues, please contact us for help.

Weebly Drag and Drop Builder tutorial

If you are a first time Weebly user, we recommend that you take a look at these videos before jumping into the Weebly builder. You can view...

Weebly Drag and Drop Builder tutorial
1


Search Results

      1. Navigate to System Preferences from the Apple Menu or from the Dock.
      2. Click on the Security & Privacy preference pane, under the Personal header.
      3. In the Security & Privacy pane, click on the Lock icon on the bottom-left.
      4. Enter your Mac's username and password and click Unlock.
      5. Click the radio button next to Anywhere.
      6. When prompted, click Allow From Anywhere. You can now install any compatible application on your Mac without the installation being blocked.
      7. Re-enabling Gatekeeper

        After updating any necessary software, follow the above instructions until step 5, and click the radio button next to Mac App Store and identified developers. Then close the System Preferences window.

how to disable gatekeeper in mac

Search Results Navigate to System Preferences from the Apple Menu or from the Dock. Click on the Security ...

how to disable gatekeeper in mac
0


Part 1 of 3: Deleting Programs Using the Trash

1
Log into your Mac with an administrator account. If you are not logged in with an administrative account, you will be asked to enter a password when you try to delete something.
  • To find out whether your account has admin rights, click on the Apple menu, select System Preferences, and then choose Users & Groups. Check that your account shows in the list as "Admin."
2
Open your Applications folder. Browse for the program that you want to uninstall. Some programs are represented by a single icon, such as Firefox, while others are a folder of multiple icons, such as Microsoft Office.
  • Programs can possibly found in other locations, such as the Desktop.
3
Drag the program or folder of programs that you wish to delete to the Trash.When you release your chosen application over the bin, you will hear a sound effect that sounds like paper being scrunched up.
  • You can quickly move selected programs to the trash by pressing⌘ Cmd+⌦ Del.
  • The Trash acts as a safety buffer in case you delete anything by mistake. If you open the Trash, you can view its contents and drag items back out if required.
4
Empty your Trash. Once you are certain that you will never need the program(s) again, you can empty your Trash, which will free up space on your computer. To empty the Trash, right-click on the Trash icon, select "Empty Trash, and then clickEmpty Trash to confirm.
  • You can quickly empty the trash by pressing ⌘ Cmd+⇧ Shift+⌦ Del. If you don't want to be prompted for a confirmation, press⌘ Cmd+⇧ Shift+⌥ Opt+⌦ Del instead.

Part 2 of 3: Deleting Support and Preference Files

1
Open the Library folder. Even though the program has been deleted, there may be lingering files left on the hard drive. These preference files are usually pretty small, and can be worth keeping if you end up reinstalling the application. If you aren't planning on ever using the program again, you can remove these files permanently.
  • You can open the Library folder by holding the ⌥ Option key and clicking the "Go" menu. The Library option should appear in the menu.
  • You can permanently unhide the Library folder by following the steps in this guide.
2
Find the files you want to remove. Look for any files or folders with the program's name or developer's name in the ~/Library/, ~/Library/Preferences/, and ~/Library/Application Support/ folders.

3
Move any files or folders that you find to the Trash. Empty the Trash to delete the files. If you can’t empty the Trash, reboot the computer and try again.


Part 3 of 3: Other Ways to Delete Programs

1
Open the Launchpad from your Dock. If you installed the program from the Mac App Store, you can delete the program from the Launchpad instead of using the Applications folder.
  • This only works for apps that have been purchased from the Mac App Store. All other programs will need to be deleted using the previous method.
2
Enable app deletion. Press and hold the ⌥ Option key or click and hold one of the icons until they all start to wiggle. Apps that can be deleted (installed from the Mac App Store) will have an "X" icon in the upper-left corner of the app icon.


3 Click the "X" icon for the app you want to delete.
 A window will appear asking you to confirm that you want to remove the application. Click Delete to confirm. The app will be moved to the Trash.

4
Empty your Trash. Once you are certain that you will never need the program(s) again, you can empty your Trash, which will free up space on your computer. To empty the Trash, right-click on the Trash icon, select "Empty Trash, and then click

how to remove or uninstall the app from your mac

Part 1 of 3: Deleting Programs Using the Trash 1 Log into your Mac with an administrator account.  If you are not logged in ...

how to remove or uninstall the app from your mac
0

Popular Posts

  • How to Merge layer blend modes in Photoshop
     If you've been using Photoshop for a while, you've probably been taking advantage of  layer blend modes , which are easy and p...
  • Turn A Photo Into A Pattern Of Colored Dots With Photoshop
    I'll be using Photoshop CS6 here but this tutorial is also fully compatible with Photoshop CC (Creative Cloud). If you're using CS5...
  • Easy Selective Color Effect With Photoshop
    Here's the image I'll be starting with ( woman in red dress photo  from Shutterstock): The original image. And here's what...
  • FTP: How to Connect Using an FTP Client
    FTP clients are the preferred method when using FTP to transfer files. An FTP Client is an application that specializes in optimizing ...
  • Weebly Drag and Drop Builder tutorial
    If you are a first time Weebly user, we recommend that you take a look at these videos before jumping into the Weebly builder. You can view...
  • telling story with shadows in photoshop
    Telling Stories With Shadows In Photoshop This is a really fun and popular effect to create in Photoshop, and you may remembe...
  • Vector Art with Photoshop
    Vector Art with Photoshop Vector art is REALLY popular at the moment. Everyone is making vector art. It’s not hard to do and you don’t ...
  • Create A Photo Within A Photo With Photoshop
    Here's the original image I'll be using for this tutorial: The original photo. And here's what we'll be working towar...
  • Brighten Underexposed Photos With The Screen Blend Mode In Photoshop
    Let's face it, today's digital cameras make snapping photos of family, friends or anything that happens to catch our eye both easy ...
  • Photo Effects Tip: Restore Missing Filters In Photoshop CS6
    Download our tutorials as printable PDFs!  Learning Photoshop has never been easier! That may be fine for some people, but what if you...

Labels

tutorials web design tips&tricks

Advertise

Find Us On Facebook

BnP Bros

Events

bnp bros. Powered by Blogger.

About us

THE BIG TIME GAMBLERS
View my complete profile

Blog Archive

  • ▼  2015 (16)
    • ▼  May (9)
      • ▼  May 22 (5)
        • how to remove or uninstall the app from your mac
        • how to disable gatekeeper in mac
        • Weebly Drag and Drop Builder tutorial
        • WordPress: Tutorial Videos
        • FTP: How to Connect Using an FTP Client
      • ►  May 23 (4)
    • ►  June (2)
      • ►  Jun 22 (2)
    • ►  July (5)
      • ►  Jul 01 (1)
      • ►  Jul 03 (1)
      • ►  Jul 14 (3)

Designed By: Templatezy